Thursday, November 9, 2017

Kitchen Remodel


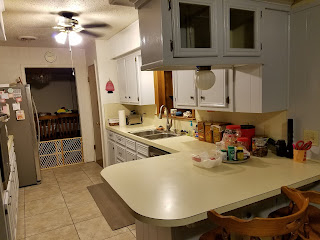
This is the way our kitchen used to look.


The first thing we did was to take the trim down and cut off the dated scallops.


Jerry used the router to round the cut edges and put the trim back up.


It really changed the look of the kitchen.


The next project was to remove two small drawers to make room for a new oven.


We ordered the Kenmore oven and mad the opening according to the specifications listed for it. When the oven arrived, it would not fit. Jerry had to trim out 1/4 inch at the top for it to go into opening.


It looks good and works well!


We then started cleaning and preparing for anew look with light grey paint.

We had some help from our friend, Richard, our realtor.


The grey worked out beautifully! It goes well with the pale yellow counter tops. We painted above the cabinets with white and the kitchen looks so much brighter.


I love the new look!!


Tuesday, July 25, 2017

Goodbye little Scion!

Goodbye little "toaster" car. You gave us very good service for eleven years. Such a fun little car to drive. I remember when we first got you, Jerry said he was going to paint you like a McDonald's happy meal and put a handle on top!!


 I hope the new owners love you as much as we did. New young lady owner will have to learn how to drive a stick shift but she won't have problems learning.


You made a great ambulance for the drive from Cross Plains to Abilene getting Jerry to the hospital after his heart attack. Never would have believed you  could do 105 miles an hour but you did good!

Thanks to son, Jay for "doctoring" this picture for us back in 2008.

We will miss you.


Here is your replacement.


 A Ford Escape is bit larger and heavier. Less fuel mileage but a safer car on the roadways. It has more bells and whistles than you had and I really like them.


 It will take me awhile to quit looking for the clutch and trying to shift gears with this one being automatic.


Tuesday, July 18, 2017

Raising The Bar. . .


We have started on the remodel of our kitchen. First thing was the bar. It was a low bar and we never used it so we decided to raise it up to match the rest of the counter top.


It was a bit difficult to get it loose but we did finally get it done.


The bottom was not in the best of shape but he managed to smooth it out. We put plywood under it to make it level with the rest of the counter top.


Jerry built two drawers to go under it. They are really a nice size too - 17 by 28 inches deep. 

I really like it raised up.

 I told someone that if Jerry wanted me to keep making him pies, he would have to raise that bar so I wouldn't have to bend over!!

My counter space is limited in a small kitchen. This makes it MUCH better.


 We still have a lot of work to do since we plan to strip or sand and repaint the cabinets. That will have to wait for cooler weather.


 We even found some nice bar stools to fit the new height.

Thursday, June 15, 2017

Handy Husband Projects

I have this cart next to the couch so I can work on projects while watching TV in the evenings. When using it to cut on my cutting board, I kept running into the side since the top was recessed.


Jerry made me a top that hinges down behind it when not in use. It works great!! Thank you Jerry!!


He sealed the wood.


Then he put brackets on it to fit the top of the cart.


He painted it


It works really well for my evening cutting table!


He attached aluminum slats to the sides to use as hinges and put a spring chain to hold it flush against the back of cart when not in use on top.


Next project he did for me was a way to hang my quilts so I could take good pictures of them.


He installed two brackets on top of our massive 12 foot king sized bed headboard. These are for a bar to rest against. I attach pieces of shoestrings to the quilt and slide over the bar to hang them. This works much better than laying them on the bed to take pictures.


We screwed two rods from shelving together for the long rod. It lays right on top of the headboard


This is one of the last larger ones that I quilted. I call this one Peony Garden.


This picture of my little cowboy/cowgirl quilt came out really good using the hanger he made.


He also made me a holder for my machine foot pedal. A good friend made me one from fabric but it still slides around on our tile floor so I am forever hunting for it. This wooden one keep it securely in place and I love it. He still wants to paint if for me if I can stay off of it long enough. LOL